Thursday, October 11, 2012

Pumpkin Perfect

I don't know what it is about Halloween that makes me so giddy. I think it has to do with all the extra decorations & preparations that go into it all, it's basically like the Christmas of weird, & my favorite decoration of them all is the pumpkin. While I've done my fair share of carving, this year I wanted to try something new & as luck may have it one of my good friends shared a link with me that spawned my inspiration... GLITTER PUMPKINS. It was a sign, a big shiny, sparkly sign. 

What you need:


Pumpkins, Elmer's Glue, Paint Brush, Glitter, Shoe box, Hot Glue & Hot Glue Gun & Rhinestones


Start by taking a clean pumpkin & place it inside of your shoe box. Using the brush, paint on some glue to a section of the pumpkin, then sprinkle glitter over that section. 

Repeat this same process around the pumpkin until it is covered in glitter. 


 As a glitter rule of thumb, it is best to lay something down under your working space to catch the extra glitter bits that fall around your project. Then when you are done with that color, you can pick up the extra glitter and funnel it back into your container to reuse at a later time. 


So I did two small pumpkins with this process, one in an all orange glitter and the second in a gold and orange glitter.


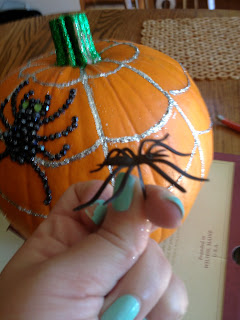
Then for my big pumpkin I wanted to do something a little bit more creative. So with a pencil I drew a spider & then using my hot glue gun and rhinestones I glued on a sparkly spider.


Then using the glue bottle, I drew a few lines down the pumpkins natural curves, & connected them like a spiders web.


Then using a silver glitter, I covered those lines. I also covered the stem in green glitter.


Then I took some of those silly spider rings and glued them around the pumpkin.


& finally I put them outside on the front step for the trick-or-treaters to enjoy!


On Pinterest? Repin Here or Here!


Tuesday, October 2, 2012

Singin' in the Rain...

First of let me start by saying Happy October! I know I have been on a two month hiatus but as we roll into my favorite month of them all, my most creative self is about to emerge & it is only fair that I share my crafty creations with all of you! 


So today I was greeted with some cold October rain & it gave me the inspiration to finish a project that I have had in mind for a while. 

I have done my fair share of crayon melts in the past. Many were gifts, some were just for the sake of art therapy. I think tye-dye is the only other craft that I have done that I have done in the past that has given me the carefree / instant-reward feeling that comes along with crayon melts. 

So sometime this summer I found myself in one of those pinterest hypnosis spells where I spent entirely too much time following pins and getting lost on the web.... but I did stumble upon these cute crayon melts of people holding umbrellas under a downpour of blue wax. This method used a hot glue gun as a way of melting the crayons; very inventive, but the fear of it messing up my beloved glue gun kept me away. 


Click here, to see the full blog!

So I sat on this idea for awhile thinking of how I could interpret all this rainy goodness & put my own spin on it. Then one day I was in the mood for some old Hollywood glits & glam & turned to my favorite musical, Singin' in the Rain. & then the little light bulb in my head turned on...


I started by tracing this iconic image on Gene Kelly swinging from a lamp post embracing the rain. I used the DVD cover as my backdrop. Then once it looked about right, I cut the silhouette out to make a tracer.


Once I had my tracer, I got some black card-stock & traced it with a silver sharpie & proceeded to cut the new silhouette out.  


Next thing was to collect several different shades of blue (& few grey) crayons. You are also going to need a some white wrapped canvas & a hot glue gun with plenty of glue sticks. Then once I had enough crayons to make it across one side of my canvas, I laid the crayons out next to the canvas in the color pattern I wanted. I tried to mix up the darker blues with the lighter ones.


Then I glued the silhouette to one end of the canvas, then the crayons to the opposite end.

 For space sake, I only glued the crayons half way on. You can glue 1 of 2 ways. Applying the glue directly to the crayon, or place a glue strip on the canvas & press the crayon down. 


Then you are going to want to either go outside or paper everywhere around the canvas. (Trust me you will be scraping up wax bits for days if you don't)


Finally I plugged my blow dryer in and gave it a go.


Holding your blow drying a few inches away from the crayons you will notice that after a few minutes, the paper around the crayons will begin to sweat. The paper will become darker & the crayons will begin to look glassy as the wax heats up. This is how you know it is just about ready to drip.


Then the crayons will begin to drip down. You can control the length of the drips and the direction by simply pulling the heat off of the canvas, it will cool and freeze almost instantly. 


 & that's it! My ode to Singin' in the Rain. :)

On Pinterest? Repin Here! or Here!