Saturday, February 9, 2013

Chocolate Cherry Cupcakes

Hello Blogosphere! So I have a lot to celebrate this month, first it has officially been 1 year (& a few days) since the launch of Rhinestoned Adventures! Yippie! 
Many thanks to my 'SuperFans' & frequent visitors for stopping by.
Secondly it's my birthday month... when is my birthday you ask? 
Well lets just say it's Leslie Knope's favorite holiday. 


That's right my birthday is on Galentines Day!


So Happy Galentines Day to all my lady friends, & Happy Birthday to me! 
& while Leslie may prefer to celebrate with waffles, I prefer to celebrate with cupcakes. 

Chocolate Cherry Cupcakes to be exact.


So I made some Devils Food cupcakes. 

( 2 cups all purpose flour, 1 tsp salt, 1 tsp baking powder, 2 tsp baking soda, 3/4 cup unsweetened coca powder, 2 cups sugar, 1 cup vegetable oil, 1 cup milk, 1 cup hot coffee or hot water, 2 large eggs, 1 teaspoon vanilla - blend together and bake for 19 minutes at 350 degrees) 

Or make these cupcakes 'semi-homemade' by purchasing a devils food box cake mix ;)


While you let your cupcakes cool separate the cherries from 1 can of cherry pie filling.
(be sure to save the extra filling for later)


When the cupcakes have cooled, take a small paring knife or an apple corer & remove the center of the cupcake. (Try not to remove the entire center so you still have the base of the cupcake.)


Then take a single cherry & place it inside the core of the cupcake.


For the filling, I use a play on ganache, but instead of using heavy cream I use the cherry pie filling.
Start by taking 1 cup white chocolate morsels & microwave at 70% for 1 minute & stir. If morsels are not melted, microwave again in 10 second increments until melted. Then stir in 3-4 tablespoons of cherry pie filling. Microwave again for 15 seconds to fully combine. Then fill the remainder of the cupcake core with the white chocolate cherry mix. 


For the frosting combine 4 tbs of butter, 4 cups confectioner's sugar (sifted), 1/4 tsp pure vanilla extract & 6 ounces of cream cheese with a electric mixer at a high speed for 2 minutes

Or just grab a can of cream cheese frosting when you pick up that box cake mix. ;)


Then take the remainder of the cherry pie filling and combine it with the cream cheese frosting. Cover & place it in the refrigerator for 15 minutes to let it set up.


Then place your frosting in a pipping bag, (or a zip lock bag with a tip cut off) & swirl onto the cupcake.


& last but not least, top with a cherry & enjoy!

For more on Leslie Knope & Galentines Day tune into Parks & Recreation on NBC


(For those wondering, I use re-usable silicone baking cups for my cupcakes. I think they are an excellent investment & actually help your cupcakes remain moist & delicious!)

On Pinterest?

Repin here!


Friday, December 28, 2012

Go Nude for New Years...

...of course by nude I mean your nail polish.

New Years is always a time to start fresh, & sometimes that means keeping it basic. Now most of the time when I think of New Years I think of sparkles, sequins & shiny confetti, however this year I wanted keep it sleek & simple; nude polish was the answer. 

Now I realize I have been MIA for the past two months, but I'm going to make it up to you by giving you three ways to go nude this New Years. 


The first look is a spin on the Half Moon nail look.

What you need:


Urban Outfitters Nude 5 w Funky Fingers Star-Studded w Reinforcement Labels w Base Coat w Quick Dry Top Coat

Start with a base coat to protect your nails from the glitter polish
 & then add 1-2 coats of Funky Fingers Star-Studded.


When the glitter dries place the Reinforcement Labels at the base of your nails. Then paint over the remaining part of your nail with Urban Outfitters Nude 5. Remove the reinforcers after painting and allow nails to dry. Then add your favorite top coat. 


voilĂ !


The next two looks are going to use sand tropez by Essie.


 This is a great color on it's own even without any New Years glitz.  


When your sipping on your champagne this New Years it's always good to remember to use proper etiquette. When in doubt, pinky out. 

What you need:


Essie sand tropez w  Essie as gold as it gets w Quick Dry Top Coat

Start with 1-2 coats of sand tropez


Then add 1-2 coats of as gold as it gets to your pinky finger to give this look a subtle glitz.


Finally this last look will dress up your nails with an frosty white ombre.

What you need:


Essie sand tropes w Essie east hampton cottage w Make-up Sponge w Quick Dry Top Coat


Start with 1-2 coats of sand tropez. Then using a make-up sponge apply a thin layer of east hampton cottage to the edge of the sponge.


Then beginning half down your nail, gently dab the end of the sponge on to your nail. Let it dry. Then moving about a centimeter up your nail repeat this process. I did this about 4-5 times. These layers will dry quickly & will not consume as much drying time as traditional coats. 


Then add some top coat & you will have frosty tips to ring in the New Year. 


On Pinterest? Repin here!

Thursday, October 11, 2012

Pumpkin Perfect

I don't know what it is about Halloween that makes me so giddy. I think it has to do with all the extra decorations & preparations that go into it all, it's basically like the Christmas of weird, & my favorite decoration of them all is the pumpkin. While I've done my fair share of carving, this year I wanted to try something new & as luck may have it one of my good friends shared a link with me that spawned my inspiration... GLITTER PUMPKINS. It was a sign, a big shiny, sparkly sign. 

What you need:


Pumpkins, Elmer's Glue, Paint Brush, Glitter, Shoe box, Hot Glue & Hot Glue Gun & Rhinestones


Start by taking a clean pumpkin & place it inside of your shoe box. Using the brush, paint on some glue to a section of the pumpkin, then sprinkle glitter over that section. 

Repeat this same process around the pumpkin until it is covered in glitter. 


 As a glitter rule of thumb, it is best to lay something down under your working space to catch the extra glitter bits that fall around your project. Then when you are done with that color, you can pick up the extra glitter and funnel it back into your container to reuse at a later time. 


So I did two small pumpkins with this process, one in an all orange glitter and the second in a gold and orange glitter.


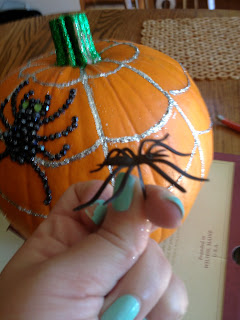
Then for my big pumpkin I wanted to do something a little bit more creative. So with a pencil I drew a spider & then using my hot glue gun and rhinestones I glued on a sparkly spider.


Then using the glue bottle, I drew a few lines down the pumpkins natural curves, & connected them like a spiders web.


Then using a silver glitter, I covered those lines. I also covered the stem in green glitter.


Then I took some of those silly spider rings and glued them around the pumpkin.


& finally I put them outside on the front step for the trick-or-treaters to enjoy!


On Pinterest? Repin Here or Here!