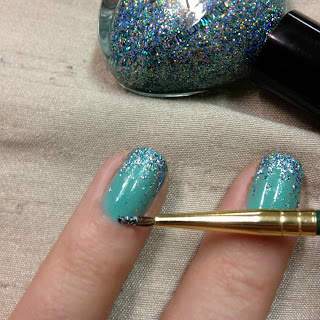
Oh yes klava superfans, the day has come that I get to show you (& the rest of the blogosphere) how to get my version of Mermaid Nails inspired by cupcakes and cashmere.
Now because I don't own Martha Stewart's loose glitter set (shocker I know, but it's way over priced) I decided to improvise & use a glitter polish. (much more affordable) I also decided to amp it up a bit & make every nail sparkly & fabulous.
What you need:
Funky Fingers Flashing Lights w Essie turquoise & caicos w Sally Hansen Insta-Dri w small detailing paint brush
Start with two coats of Essie's turquoise & caicos
next paint a line of Funky Fingers Flashing Lights across the edge of your nail, just like you would a french. Don't stress about the line being super perfect, it will blur in the next steps.
Apply a small amount of polish to your paint brush. (Remember not to dip the paint brush in polish bottle, just dab on a little bit using the polish brush.) 'Less is more.'
Using the paint brush in a rocking motion back & forth; gently graze the brush from the tip of your nail & rock back once you get about 3/4 to 1/2 of the way down. You may have to reload your paint brush with polish per nail.
You don't want the lines to be perfectly even, try to vary their lengths & go for an uneven/asymmetrical feel. You can later go in a dot in some smaller pieces of glitter using a semi dry brush (Just wipe of the excess polish and blow on it for a second).
When your satisfied with your nails apply 2 coats of top coat to seal the deal.
& voilà, mermaid nails that even Ariel herself wouldn't mind rocking. ;)
On Pinterest? Repin Here!


No comments:
Post a Comment